
Introduction
Ever wondered how to build an AI agent that can not only understand what you're asking but also generate and execute code to solve your problems? In this tutorial, we're going to build exactly that - a powerful AI agent capable of understanding requests, generating JavaScript code, and executing it safely.
By the end of this guide, you'll have:
- Built a fully functional autonomous agent
- Learned the fundamentals of LangGraph and agent architectures
- Created a system with short and long-term memory
- Deployed your agent using Genezio
Tech stack:
- LangGraph.js - to orchestrate the ai agent
- Anthropic for LLM models
- Genezio to deploy the whole stack: frontend, ai agent, code executor
- Javascript, NodeJS, Express for the backend and api
- React for the client side app
Let's dive in!
What is an AI Agent?
An AI agent is more than just a language model - it's a system that can understand, plan, and take actions to achieve goals. Unlike traditional chatbots that simply respond to messages, agents can interact with tools, execute code, and maintain a memory of previous interactions.
Think of an agent as an AI assistant with superpowers - it can not only discuss concepts but also perform tasks for you by using various tools at its disposal.
Agent Architecture
There are several ways to build AI agents, with different level of control.
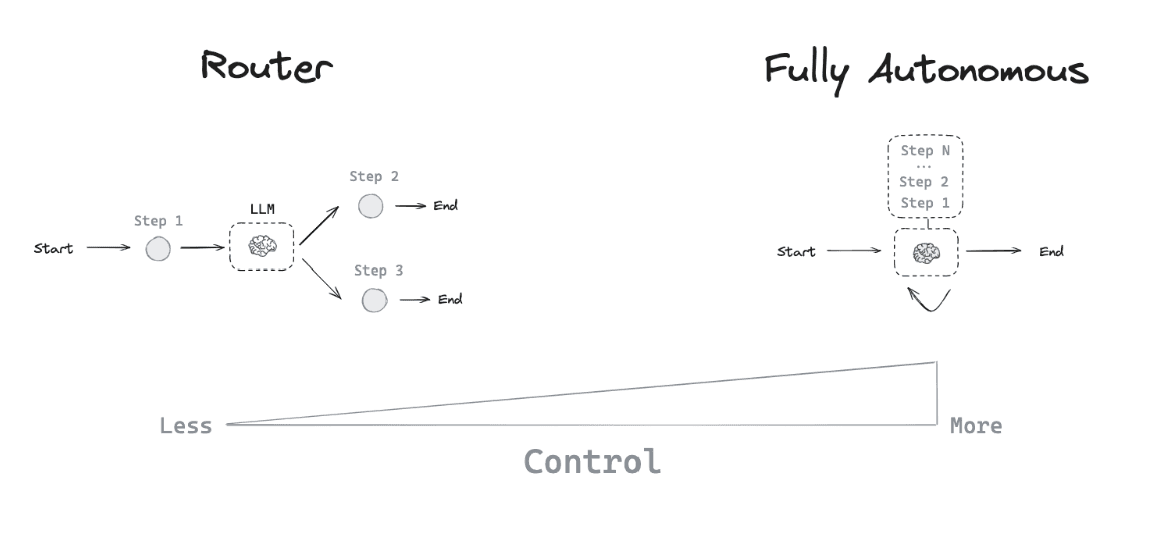
The most common architectures follow similar patterns:
- ReAct (Reasoning + Acting): The agent alternates between reasoning about what to do and taking actions.
- Plan-and-Execute: The agent first develops a comprehensive plan, then executes it step by step.
- Function Calling: The agent directly decides which functions/tools to call to solve a problem.
In our case, we'll use LangGraph to implement a ReAct-style agent that can think about what JavaScript code to generate and then execute it.
What is LangGraph?
LangGraph is a powerful framework built on top of LangChain that helps us create agents with complex workflows. It's particularly good at:
- Managing the agent's thinking and reasoning process
- Coordinating multiple tools and capabilities
- Handling both short-term (conversation context) and long-term memory
Think of LangGraph as the brain of our agent - it decides what to do next based on user input and previous experiences.
Let's Build Our Agent!
Setting Up the Project
First, let's set up our project structure:
- Create a server/agent folder for our agent code
- Initialize a new Node.js project in that folder with npm init -y
- Get your Anthropic API key and store it in a .env file
Make sure to add .env to your .gitignore file for security.
Creating a Basic Agent
Let's start by installing LangGraph and integrating it with Anthropic's Claude model:
npm install @langchain/langgraph @langchain/core @langchain/anthropic zod
We'll use the createReactAgent function from LangGraph, which implements the ReAct pattern we discussed earlier:
import { createReactAgent } from '@langchain/langgraph/prebuilt';import { ChatAnthropic } from '@langchain/anthropic';const model = new ChatAnthropic({model: 'claude-3-5-sonnet-latest',});const agent = createReactAgent({llm: model,tools: [],});
Now let's try invoking our agent:
// Use the agentconst result = await agent.invoke({messages: [{role: 'user',content: 'Hello, how can you help me?',},],});console.log(result.messages.at(-1)?.content);
Test it by running:
node --env-file=.env agent.js
Great! At this point, you should see a response from your agent. But it's not very useful yet without any tools. Let's change that.
Giving Our Agent Tools
What makes agents powerful is their ability to use tools. Let's create a simple weather tool:
import { tool } from '@langchain/core/tools';// Define the tools for the agent to useconst weatherTool = tool(async ({ query }) => {// This is a placeholder, but don't tell the LLM that...if (query.toLowerCase().includes('san francisco')) {return "It's 60 degrees and foggy.";}return "It's 90 degrees and sunny.";},{name: 'weather',description: 'Get Weather in a specific city',schema: z.object({query: z.string().describe('The query to use in your search.'),}),});
Now let's give this tool to our agent:
const tools = [weatherTool];const agent = createReactAgent({llm: model,tools});
Test it with a weather query:
What's the weather in San Francisco
You should see the agent using the weather tool and responding with information about San Francisco's weather!
Adding Memory to Our Agent
If you try to follow up with something like "What city was that for?", the agent won't understand what you're talking about. That's because it doesn't remember previous conversations - it lacks memory!
Let's add long-term memory to our agent:
import { MemorySaver } from '@langchain/langgraph';// Initialize memory to persist state between graph runsconst checkpointSaver = new MemorySaver();const agent = createReactAgent({llm: model,tools,checkpointSaver, // <- Give the memory saver to our agent});
With memory in place, we need to modify how we invoke the agent, adding a thread ID to group related conversations:
const result = await agent.invoke({messages: [],},{ configurable: { thread_id: 42 } } // <- add the thread id);
Now when you ask follow-up questions, the agent will remember the context of your previous conversations!
Creating an HTTP API
Next, let's make our agent accessible through a REST API so we can build a user interface for it:
Install express:
npm install express cors @types/express
Create the express app and define 1 endpoint inside the agent/index.js
import express from 'express';import cors from 'cors';import { agent } from './agent.js';const app = express();const port = 3001;app.use(express.json());app.use(cors({ origin: '*' }));app.post('/generate', async (req, res) => {const { prompt, thread_id } = req.body;const result = await agent.invoke({messages: [{role: 'user',content: prompt,},],},{ configurable: { thread_id } });res.json(result.messages.at(-1)?.content);});app.listen(port, () => {console.log(`Agent API listening on port ${port}`);});
Run the server
node --env-file=.env --watch index.js
You can test it with curl:
curl -X POST http://localhost:3001/generate \-H "Content-Type: application/json" \-d '{"prompt": "What’s the weather in San Francisco?", "thread_id": 42}'
Building a Code Execution Tool
Now let's add the most exciting feature - the ability to generate and execute JavaScript code! First, let's create a simple tool that pretends to execute code:
const jsExecutor = tool(async ({ code }) => {console.log('Running js code:', code);return {stdout: 'Current Bitcoin price: $1,000,000',stderr: '',};},{name: 'run_javascript_code_tool',description: `Run general purpose javascript code.This can be used to access Internet or do any computation that you need.The output will be composed of the stdout and stderr.The code should be written in a way that it can be executed with javascript eval in node environment.`,schema: z.object({code: z.string().describe('code to be executed'),}),});
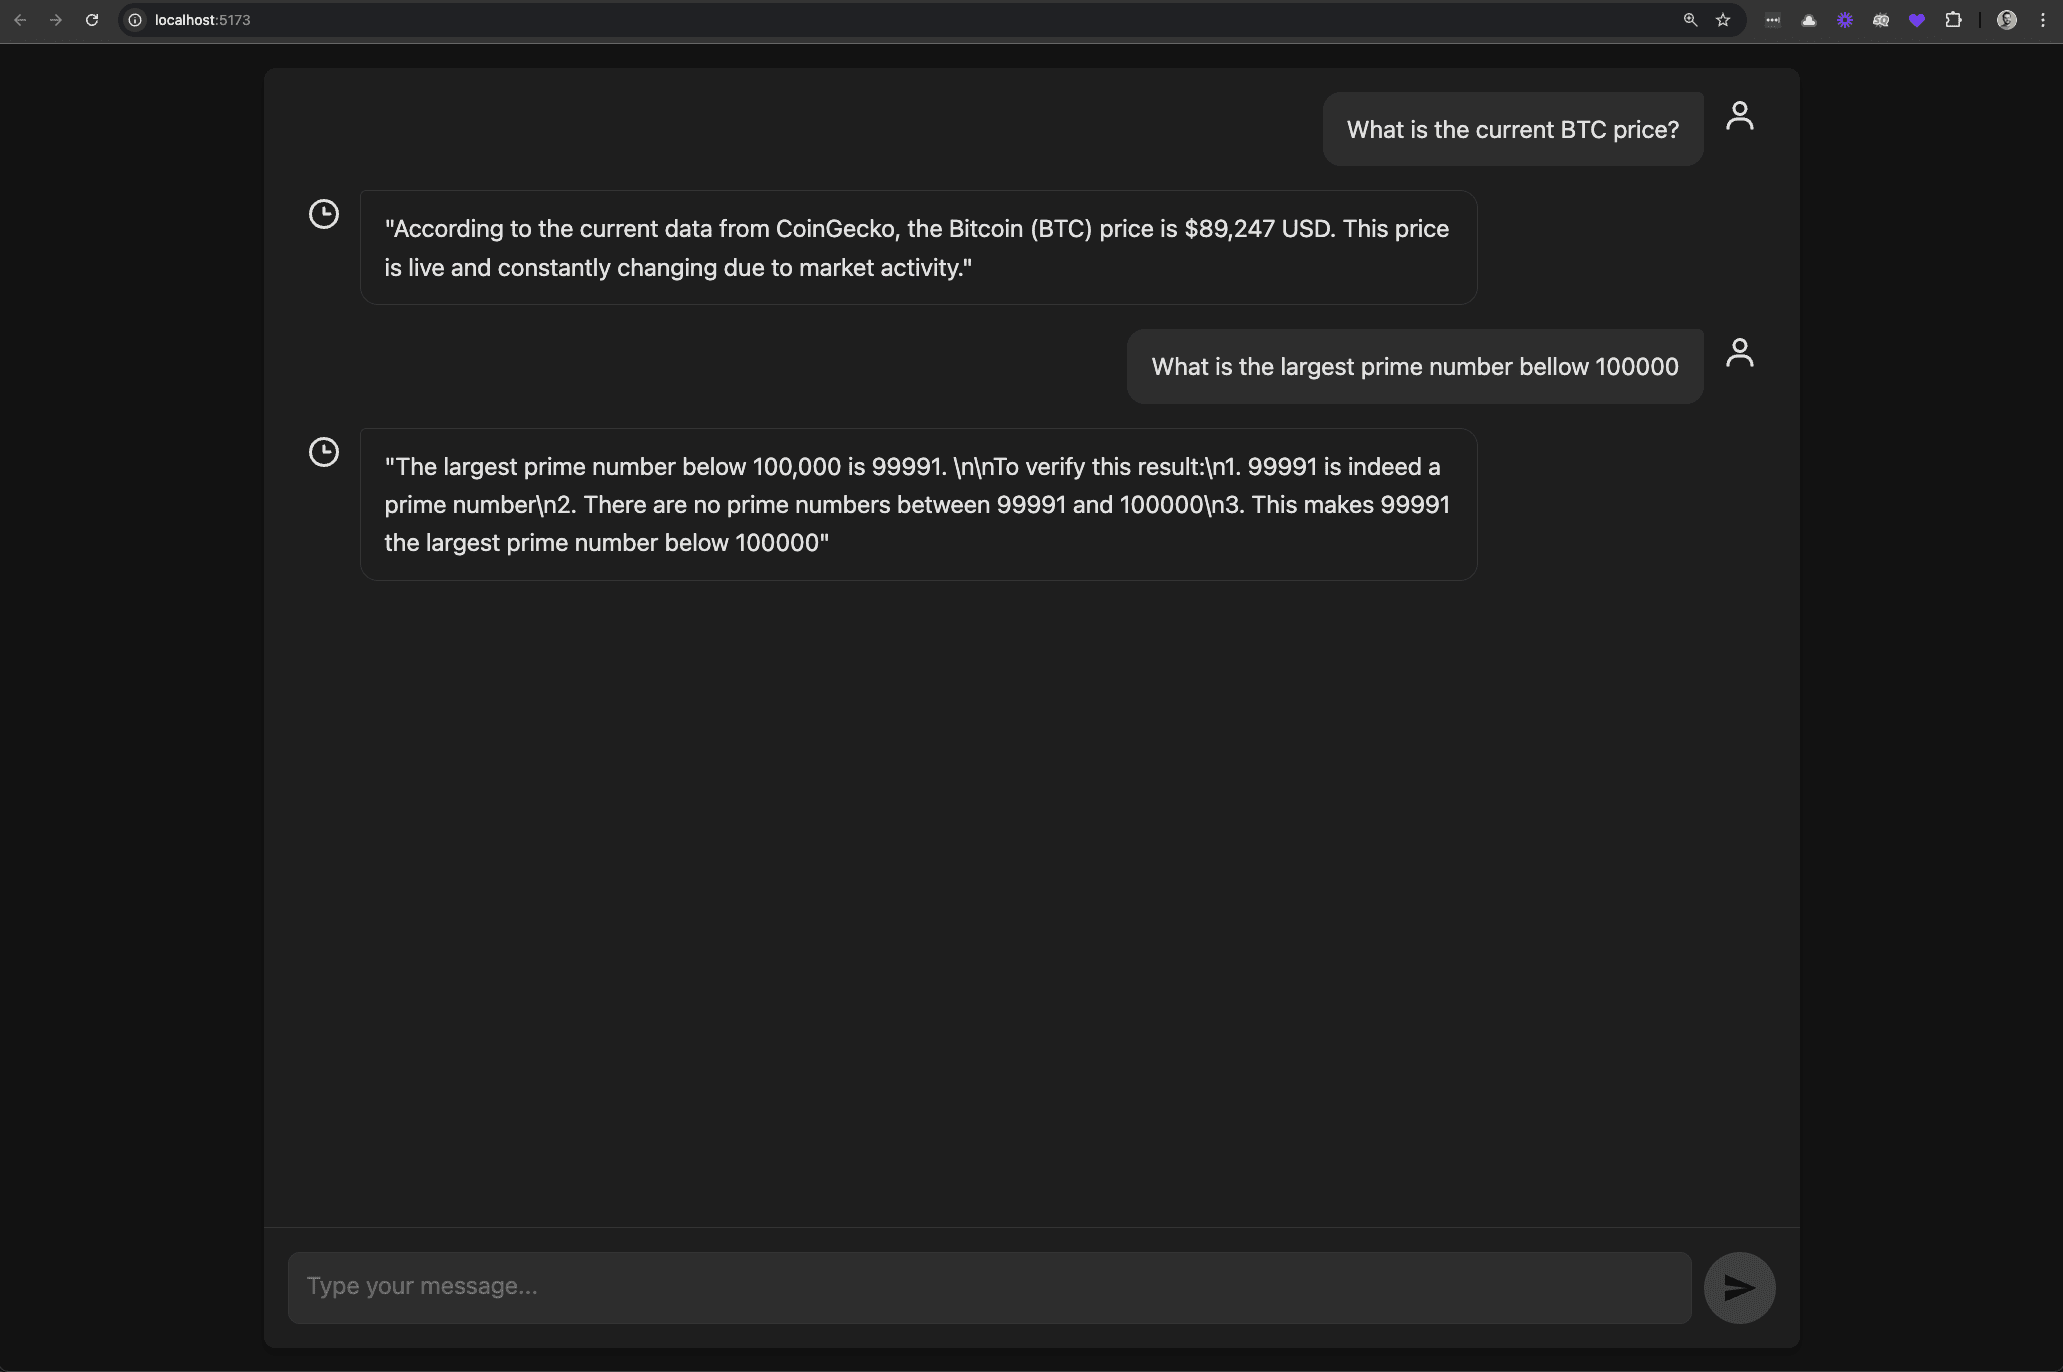
Let's test it by asking the agent: "What is the current BTC price?"
curl -X POST http://localhost:3001/generate \-H "Content-Type: application/json" \-d '{"prompt": "What is the current BTC price?", "thread_id": 42}'
You'll notice the agent generates JavaScript code that would fetch Bitcoin price from an API. But our tool is just returning a dummy value. Let's make it actually run the code!
We'll use JavaScript's eval() function to execute the code:
eval(code)
If we do that, we will see that the code was indeed executed and the output printed in the console logs.
Now, we have to capture the logs and return them. Here is a helper function that will do that.
async function evalAndCaptureOutput(code) {const oldLog = console.log;const oldError = console.error;const output = [];let errorOutput = [];console.log = (...args) => output.push(args.join(' '));console.error = (...args) => errorOutput.push(args.join(' '));try {await eval(code);} catch (error) {errorOutput.push(error.message);}console.log = oldLog;console.error = oldError;return { stdout: output.join('\n'), stderr: errorOutput.join('\n') };}
Now, update our tool to use this function:
const jsExecutor = tool(async ({ code }) => {const result = await evalAndCaptureOutput(code);return result;},{...});
Now when the agent generates code, it will be executed in real-time and the results will be used to provide an accurate answer!
Security Considerations
Running AI-generated code has security implications. To keep things safer, let's extract the code execution into a separate service:
- Create a new folder server/executor
- Init a new Node project npm init -y
- Install dependencies: npm install express cors @types/express
And implement the server/executor/index.js to run an express app, with one endpoint that will receive code, will execute it, and will return back the logs.
import express from 'express';async function evalAndCaptureOutput(code) {const oldLog = console.log;const oldError = console.error;let output = [];let errorOutput = [];console.log = (...args) => output.push(args.join(' '));console.error = (...args) => errorOutput.push(args.join(' '));try {await eval(code);} catch (error) {errorOutput.push(error.message);}console.log = oldLog;console.error = oldError;return { stdout: output.join('\n'), stderr: errorOutput.join('\n') };}const app = express();const port = 3000;app.use(express.json());app.post('/', async (req, res) => {const code = req.body.code;const result = await evalAndCaptureOutput(code);res.json(result);});app.listen(port, () => {console.log(`JS Executor app listening on port ${port}`);});
Now, update our JavaScript executor tool from server/agent/agent.js to call this service instead of executing code directly:
const jsExecutor = tool(async ({ code }) => {const response = await fetch(`${process.env.EXECUTOR_URL}`, {method: 'POST',headers: {'Content-Type': 'application/json',},body: JSON.stringify({ code }),});const result = await response.json();return result;},{...});
This way, if the generated code tries anything malicious, it won't have direct access to our agent's environment.
To test it, first run the executor API and then invoke the agent.
Building the Frontend
Now let's create a clean, minimalist chat interface for our agent. Using Vite, we'll set up a new React app:
npm create vite@latest
Let’s use an LLM to generate the code. Here is the prompt I used:
Build a simple UI interface for an AI Chat App with Dark mode, minimalistic design.Project Structure:1. Main chat interface with message history2. The chat interface is wide with a maximum widht of 1024px3. Input area for user messages4. Send message implementation, with loading statesStyling:- Dark mode with a minimalistic design- Clean typography- Responsive layoutImages and Media:- No images needed- Use SVG for iconsFrameworks and Libraries:- React app using Vite- no additional libraries- CSS for stylingAPI Integration:- Will fetch the messeage by sending a POST request to the /generate endpoint. The url of the API will be available throughj env var VITE_API_URL- The body of the request expects the input prompt and the thread id as {prompt: string, thread_id: number}- The API will return just the content of the messageLet's build this out! Output the code for 2 files: App.tsx and index.css
After you add the code, run the react app with npm run dev and make sure it works and sends the requests to our Agent API.
Deploy
Finally, let's deploy our entire stack using Genezio.
First, install genezio cli
npm install genezio -g
Then, login using your access token:
genezio login <access_token>
Create a genezio.yaml file in the root directory:
name: Langgraph-agentregion: us-east-1yamlVersion: 2backend:path: serverlanguage:name: jspackageManager: npmenvironment:EXECUTOR_URL: ${{ backend.functions.executor.url }}functions:- name: agentpath: ./agententry: index.jstype: httpServer- name: executorpath: ./executorentry: index.jsmaxConcurrentRequestsPerInstance: 1type: httpServerfrontend:environment:VITE_API_URL: ${{ backend.functions.agent.url }}path: clientpublish: distscripts:build: npm run builddeploy: npm install
This configuration will:
- Deploy both our agent API and executor service
- Build and deploy the frontend
- Connect all the pieces together automatically
Deploy
Before we deploy, we can test the genezio stack locally using
genezio local --env .env
If everything works locally, we can move on to deploy our app to Genezio
genezio deploy
Make sure to add your ANTHROPIC_API_KEY as an environment variable using Genezio Dashboard.
Now, our app is publicaly accessible. The agent and the code executor are running in a safe and secure environment.
Conclusion
Congratulations! You've built a complete AI agent capable of:
- Understanding natural language requests
- Generating and executing JavaScript code
- Maintaining context across conversations
- Providing a user-friendly interface
This is just the beginning of what's possible with AI agents. You could extend this by:
- Adding more tools (like database access, file manipulation, etc.)
- Implementing fine-grained security controls
- Adding authentication for multi-user support
- Enabling the agent to create visualizations or interactive dashboards
AI agents represent the next generation of AI applications - ones that don't just respond to queries but actively solve problems by taking actions in the world. As this technology evolves, the possibilities are truly endless!
I hope you enjoyed building your first AI agent. Happy coding!