
Introduction
In the world of mobile development, building a health and fitness app can be as rewarding as it is challenging. Today, we're building a MyFitnessPal clone, using React Native and Expo for the app development, and Expo Router for navigation. This guide will walk you through setting up the project, designing the UI, integrating a Food API via GraphQL, setting up a custom database, and incorporating a barcode scanner for a seamless user experience.
Video tutorial
This guide was designed to be used together with the video tutorial. Open it in a new tab, and let’s get started.
Asset Bundle
The Asset bundle contains all the required assets to help you follow along.
Download Asset BundleUI with React Native
Setting Up a New Expo Project
First things first, let's kick things off by setting up our project environment:
Create a New Project: Open your terminal and run:
npx create-expo-app@latest MyFitnessPal
For TypeScript enthusiasts, simply rename App.js to App.tsx after creation, and Expo will handle TypeScript configuration automatically.
Start the Development Server: Bring your project to life by running:
npm start
The next step is to run our app on a device. The easiest way is to download the Expo Go app (available both on Play Market and App Store), and then scan the QR you see in the terminal. That way, you can continue to develop the app and see the hot updates directly on your device.
Optionally, you can run the app on an iOS Simulator by pressing i or on Android Emulator by pressing a. But for this, you have to set up the emulators using Xcode and/or Android Studio.
Integrating Expo Router
To navigate through our app smoothly, we'll need to install and set up the Expo Router:
- Install Expo Router by following the documentation provided by Expo. You can find it here.
Building the Search Screen UI
A key component of MyFitnessPal is its search functionality. We'll replicate this by:
- Creating a Food list item component for displaying individual food entries.
- Rendering a list to showcase these food items dynamically.
- Adding a search bar for user queries.
Here's a glimpse of what we're aiming for:

Backend with GraphQL and IBM StepZen
Integrating the Food API
Our app needs data, and what better way to obtain it than using the Edamam Food Database API? Here's how:
- Sign up on Edamam and generate your API key by creating a new app in their dashboard. You should have two things there, the Application ID and the Application Keys. Note them down, we’ll need them next.
Integrating IBM StepZen
To transform our REST API calls to GraphQL, we'll use IBM StepZen:
- Follow the StepZen installation guide to set up the StepZen CLI.
- Create an api folder in your project and import the Food API parser endpoint from Edamam with StepZen's CLI.
stepzen import curl -X 'GET' \\'<https://api.edamam.com/api/food-database/v2/parser?app_id=><YOUR_APP_ID>&app_key=<YOUR_APP_KEY>&ingr=pizza' \\-H 'accept: application/json'
- Make sure to replace the <YOUR_APP_ID> and <YOUR_APP_KEY> with your actual keys from the Edemam dashboard.
If everything worked, we should see a message:
Successfully imported curl data source into your GraphQL schema
The next steps would be to start your GraphQL API with stepzen start, test your queries and add the keys through configuration.
- Securely manage your API keys by following the instructions on StepZen's configuration and keys management page. This ensures your API keys are not hard-coded into your application, offering an extra layer of security and ease of maintenance.
As an extra step here, we’ll clean and rename the generated GraphQL Schema so we maintain a clear and organized codebase, making it easier for you to navigate and develop further features.
Fetching Data with Apollo Client
For data fetching, Apollo Client is our go-to:
- Install Apollo and set up the Apollo client as per the Apollo documentation.
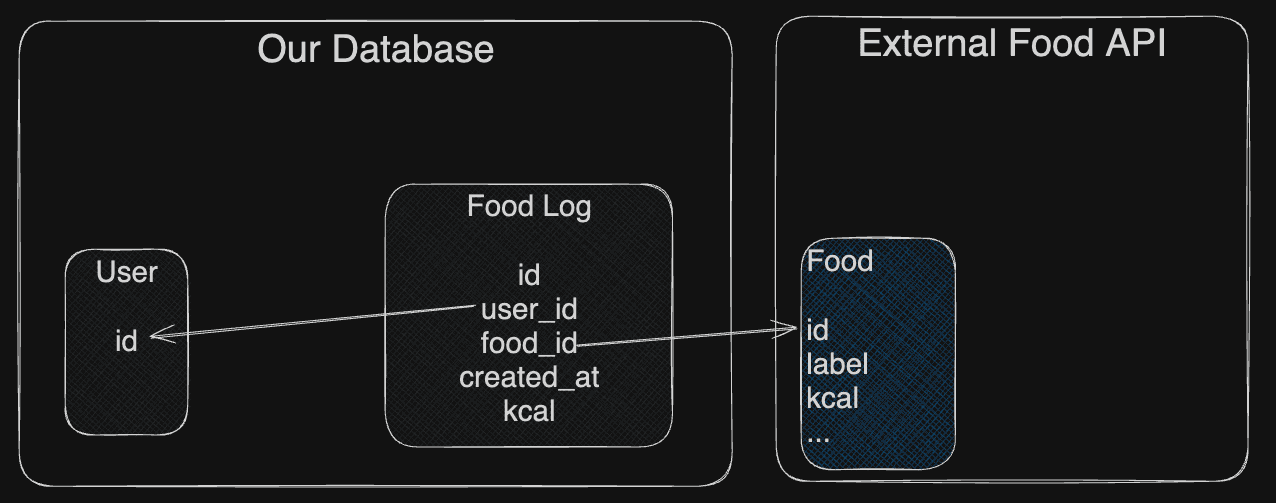
Integrating Custom Database
Tracking food and calorie intake requires a robust database. We'll use PostgreSQL for this:
- Use Neon.tech to create and host your PostgreSQL database.
- Create a food_log table to keep track of user entries.
-
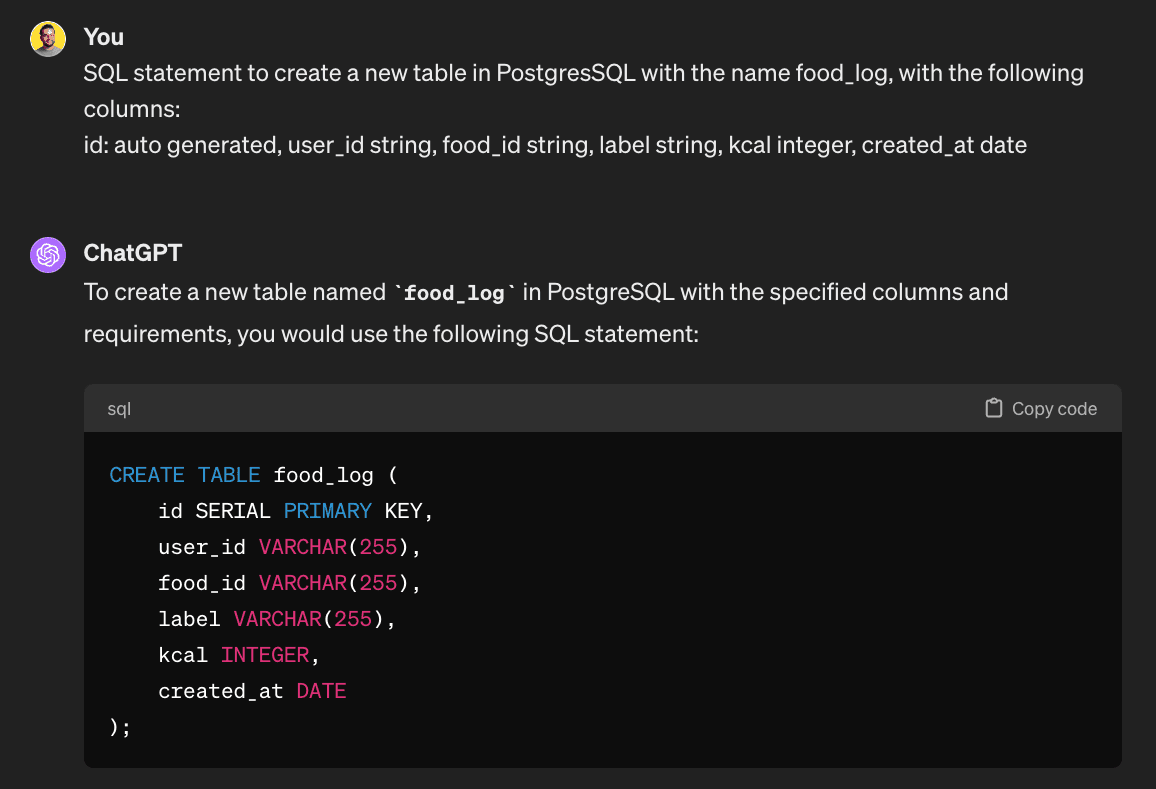
Use ChatGPT to generate SQL queries
-
Here's the SQL query you'll need to run:
CREATE TABLE food_log (id SERIAL PRIMARY KEY,user_id VARCHAR(255),food_id VARCHAR(255),label VARCHAR(255),kcal INTEGER,created_at TIMESTAMP WITHOUT TIME ZONE DEFAULT CURRENT_TIMESTAMP);
Connecting StepZen to Our Database
Integrating StepZen to our PostgreSQL database enhances your app by allowing you to perform complex queries with ease. You can use StepZen's @dbquery directive to connect directly to your PostgreSQL database.
Next, structure your GraphQL schema to include mutations for creating daily food logs and design queries to fetch user logs.
Calculating Today's kCals
To give users a snapshot of their caloric intake, implement a query that sums up calories consumed on a specific day. This is done by executing a SQL query against your database and mirroring this logic in your GraphQL API through StepZen:
SQL to fetch today's total calorie intake:
SELECT SUM(kcal) AS total_kcalFROM food_logWHERE user_id = 'vadim'AND DATE(created_at) = '2024-03-08';
StepZen GraphQL query to achieve the same:
KcalTotalForDate(username: String!, date: Date!): KcalTotalForDate@dbquery(type: "postgresql"query: "SELECT SUM(kcal) AS total_kcal FROM food_log WHERE user_id = $1 AND DATE(created_at) = $2"configuration: "postgresql_config")
Incorporating a Barcode Scanner
The feature that makes MyFitnessPal so popular is the barcode scanner that redirects you directly to the food item page. We'll add this functionality to our app using Expo's Camera module. This will allow us to scan food items directly in our app.
<Camerastyle={{ height: 200, width: '100%' }}onBarCodeScanned={(res) => console.log(res)}/>
Wrapping Up
🎉 Congratulations on making it through this comprehensive guide to building a MyFitnessPal clone with React Native, Expo, and Expo Router!
I hope that you have managed to follow along with this project-based tutorial and that you have learned something new today.
By following the video alongside these steps, we've laid the foundation for a functional and scalable health and fitness app. From setting up the project environment and designing a user-friendly UI to integrating a Food API and setting up a custom database, we’ve covered crucial aspects of mobile app development.
This is just the starting point fo this food tracking application, as the sky’s the limit of what features you can add here for further customization. Whether you're aiming to add more detailed nutritional information, integrate wearable device data, or even incorporate social sharing features, the possibilities are endless. So keep exploring, experimenting, and iterating to make your app even more powerful.
Happy coding, and here's to your health and fitness journey! 🥗💪