
Introduction
I couldn’t believe how easy it is to build an AI-based recommendation system using Embeddings and Supabase Vector.
In this tutorial, I’ll help you learn more about AI, Vectors, and Embeddings by building a Movie Recommendation system.
The main features of our app will be:
- Recommend similar movies
- Semantic search: Search our movie database, based on a user prompt.
The tech stack used in this tutorial is:
- React Native, Expo for the mobile app
- Supabase for the backend
- PostgreSQL for the Database
- Supabase Vector for storing and querying Embeddings
Let’s get started!
Asset Bundle
The Asset bundle contains all the required assets to help you follow along.
Download Asset BundleDataset
For this tutorial, we will use The Movies Dataset which contains information about over 45k movies.
I already processed and cleaned the dataset for you. The movies.csv file from the Asset Bundle contains the most popular 2500 movies, with only the columns that we need.
Supabase
For the backend of our application, we will use Supabase. Create an account if you don’t have one.
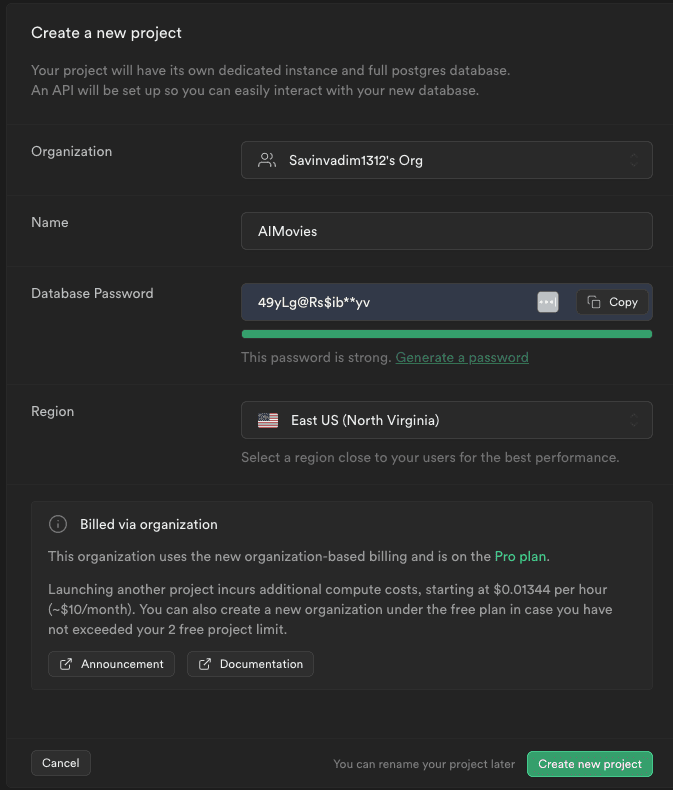
From the Dashboard, create a new project.
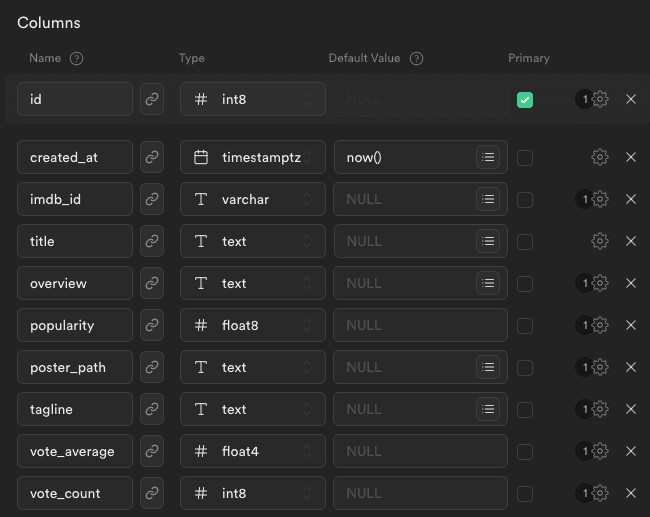
Create the Movie table
Let’s navigate to the Table Editor and create a new table with the following columns.
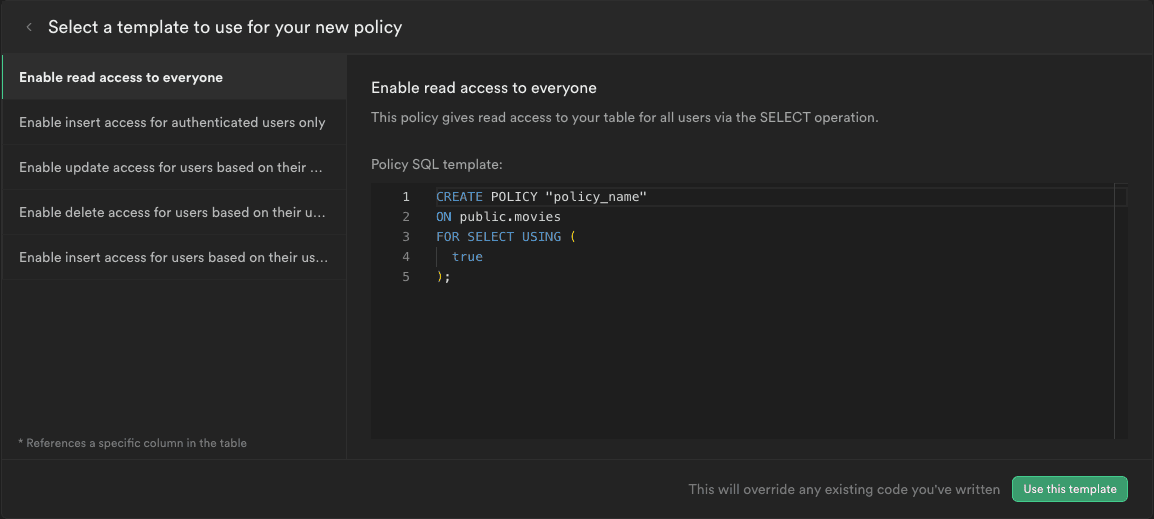
Once our table is created, we have to setup the policies of who is allowed to query the table. By default, no one has access to any operations. Let’s add a policy to allow all users to read the data.
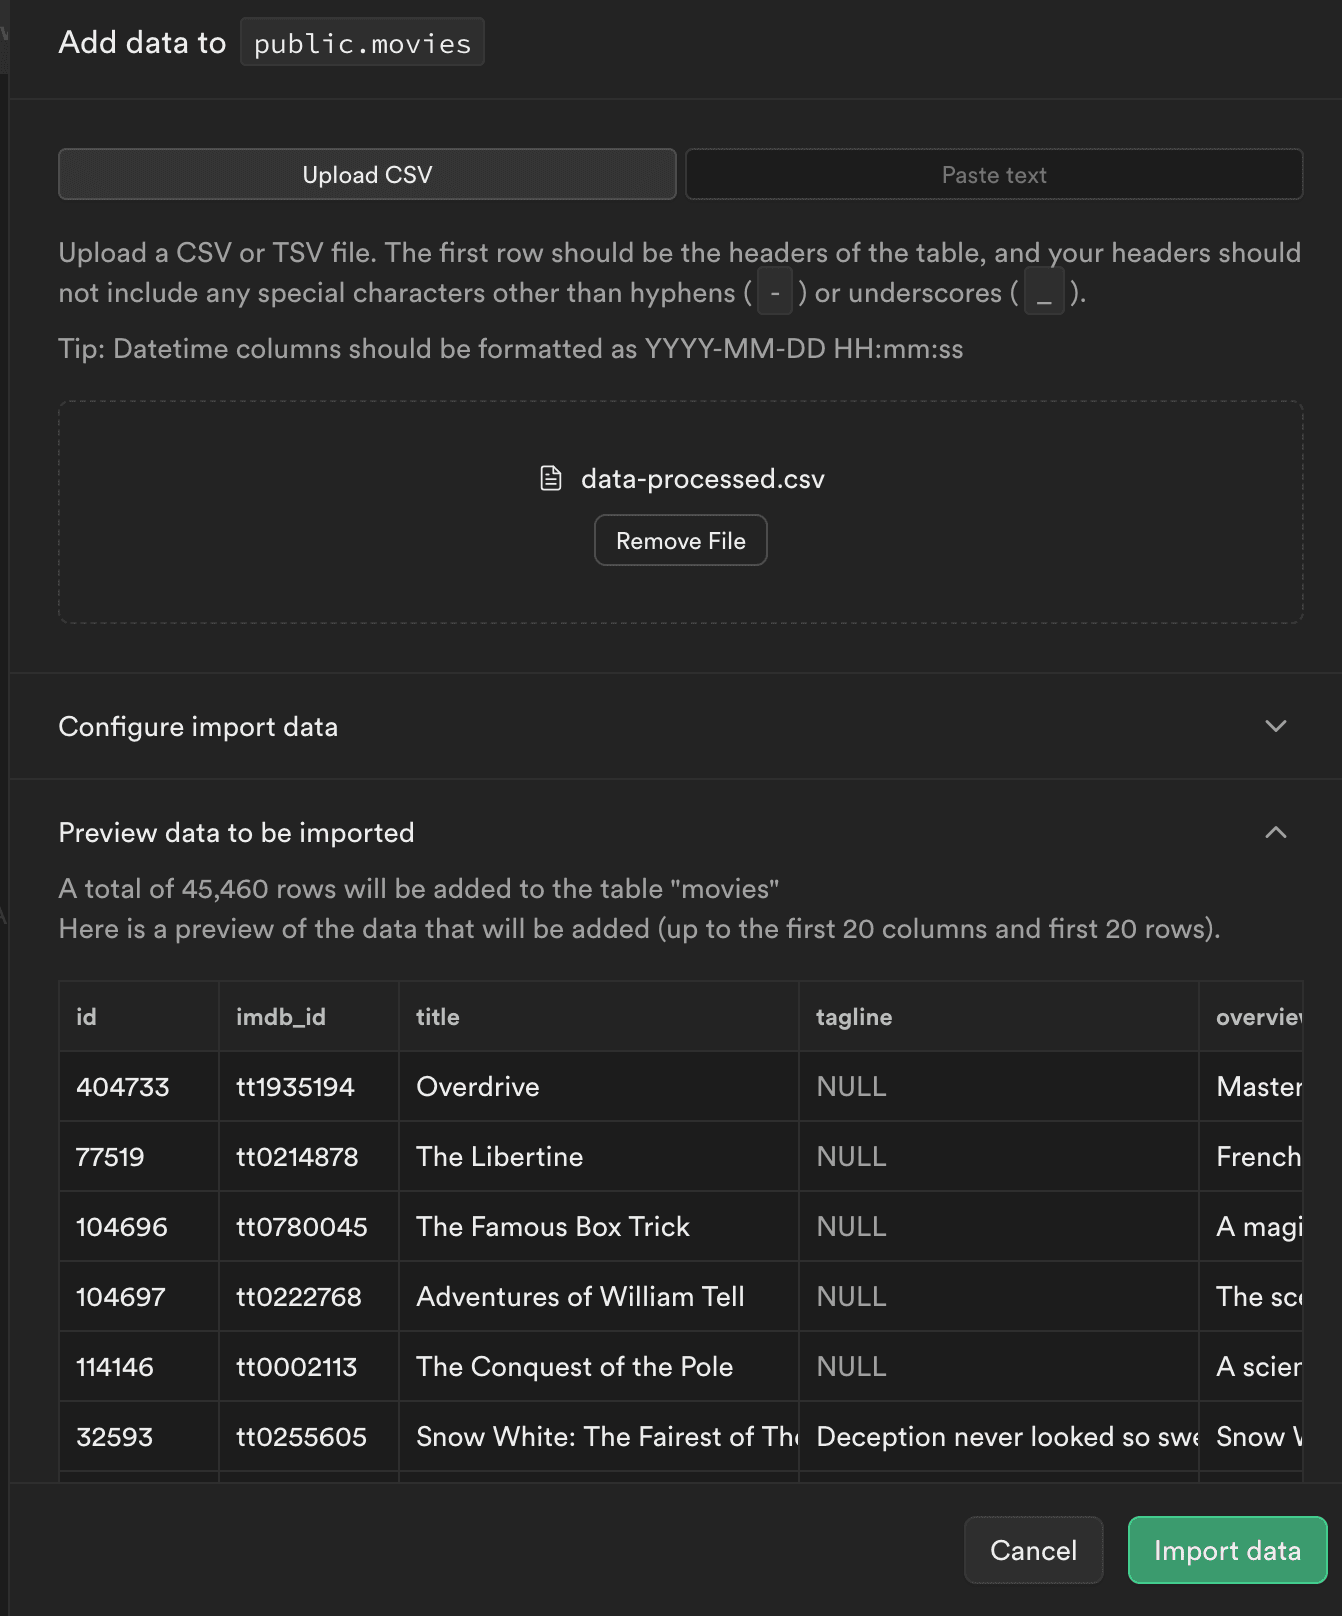
Import movie dataset
Now that we have a table for the movies, we can import the dataset of movies. We can do that by uploading the CSV file movies.csv from the Asset Bundle.
Expo app
Let’s create our mobile app using Expo:
npx create-expo-app@latest AIMovies -t
Choose the Blank (Typescript) template.
After the project is initialized, let’s open it up in our editor of choice.
Open a terminal, and start the development server with npm start
The next step is to run our app on a device. The easiest way is to download the Expo Go app (available both on Play Market and App Store), and then scan the QR you see in the terminal. That way, you can continue to develop the app and see the hot updates directly on your device.
Optionally, you can run the app on an iOS Simulator by pressing i or on Android Emulator by pressing a. But for this, you have to set up the emulators using Xcode and/or Android Studio.
Link the Expo project with Supabase
https://supabase.com/docs/guides/getting-started/tutorials/with-expo-react-native
We can link the Supabase project configuration with the Expo app. Later, this will help us manage the Supabase backend from our code editor.
npx supabase link --project-ref <project-id>
Also, we can pull the database schema
npx supabase db pull
Supabse client
To interact with the Supabase backend, let’s install the dependencies:
npm install @supabase/supabase-js react-native-elements @react-native-async-storage/async-storage react-native-url-polyfill
Now let's create a helper file src/lib/supabase.ts to initialize the Supabase client
import 'react-native-url-polyfill/auto';import AsyncStorage from '@react-native-async-storage/async-storage';import { createClient } from '@supabase/supabase-js';const supabaseUrl = 'https://<PROJECT_ID>.supabase.co';const supabaseAnonKey = '<ANON KEY';export const supabase = createClient(supabaseUrl, supabaseAnonKey, {auth: {storage: AsyncStorage,autoRefreshToken: true,persistSession: true,detectSessionInUrl: false,},});
Fetch movies
Using the Supabase client we set up in the previous step, we can already start interacting with our database.
Let’s query the movies inside the App.tsx
const [movies, setMovies] = useState([]);useEffect(() => {const fetchMovies = async () => {const { data: movies } = await supabase.from("movies").select("*").range(0, 25);setMovies(movies);};fetchMovies();}, []);console.log(JSON.stringify(movies, null, 2));
Display movies
Let’s render a list of movies on the screen. For that, we first need a component that will render on movie. Let’s set up this component in src/components/MovieItem.tsx
import { Pressable, StyleSheet, Text, View } from 'react-native';type MovieItemPros = {item: any;index: number;};const MovieItem = ({ item: movie, index }: MovieItemPros) => {return (<Pressable style={styles.container}><Text style={styles.index}>#{index + 1}</Text><View style={{ flex: 1 }}><Text style={styles.title}>{movie.title}</Text><Text style={styles.subtitle}>{movie.tagline}</Text></View></Pressable>);};const styles = StyleSheet.create({container: {flex: 1,padding: 20,flexDirection: 'row',alignItems: 'center',},index: {fontSize: 40,color: 'gray',fontFamily: 'Courier New',marginRight: 15,},title: {fontSize: 16,fontWeight: 'bold',color: 'gainsboro',marginVertical: 5,},subtitle: {color: 'gray',},});export default MovieItem;
Now, inside App.tsx we can use a <FlatList /> component to render a list of movies based on the response from supabase.
<SafeAreaView><FlatList data={movies} renderItem={MovieItem} /></SafeAreaView>
From the App.tsx styles, I left only:
container: {flex: 1,backgroundColor: '#181413',},
Setup Expo Router
Besides the home screen, we will also need the details screen of the movie. That’s why, we need Expo Router to help us implement the navigation. Let’s follow the getting started guide.
Once we configured the Expo Router, we need to create the src/app directory. We can now move the App.tsx to src/app/index.tsx
Add the details page for the movie src/app/[id].tsx
import { View, Text, StyleSheet, ActivityIndicator } from 'react-native';import { useEffect, useState } from 'react';import { useLocalSearchParams } from 'expo-router';import { supabase } from '../lib/supabse';const MovieDetails = () => {const { id } = useLocalSearchParams();const [movie, setMovie] = useState(null);useEffect(() => {const fetchMovie = async () => {if (!id) {return;}const { data: movie } = await supabase.from('movies').select('*').eq('id', id).single();if (movie) {setMovie(movie);}};fetchMovie();}, []);if (!movie) {return <ActivityIndicator />;}return (<View style={styles.container}><Text style={styles.title}>{movie.title}</Text><Text style={styles.subtitle}>{movie.tagline}</Text></View>);};const styles = StyleSheet.create({container: {flex: 1,padding: 20,},title: {fontSize: 16,fontWeight: 'bold',color: 'gainsboro',marginVertical: 5,},subtitle: {color: 'gray',},});export default MovieDetails;
When we press on a MovieItem from the list, we want to navigate to the details page. For that, you have to wrap your MovieItem inside the <Link /> from the expo-router
const MovieItem = ({ item: movie, index }: MovieItemPros) => {return (<Link href={`/${movie.id}`} asChild><Pressable style={styles.container}>...</Pressable></Link>)}
Finally, you can adjust the screens by creating the root layout inside src/app/_layout.tsx
import { Stack } from 'expo-router';import { ThemeProvider, DarkTheme } from '@react-navigation/native';const RootLayout = () => {return (<ThemeProvider value={DarkTheme}><Stack><Stack.Screen name="index" options={{ headerShown: false }} /><Stack.Screen name="[id]" options={{ title: 'Movie details' }} /></Stack></ThemeProvider>);};export default RootLayout;
AI & Vectors
Supabase provides an open-source toolkit for developing AI applications using Postgres and pgvector.
With Supabase Vector, we can store and query vectors directly inside our Postgres database. This enables us to build AI-based apps using Text Embeddings.
What are Embeddings?
Embeddings are the representation of any data (text, image, audio) as a Math Vector (an array of numbers).
In simple terms, Embeddings capture the "relatedness" of text, images, video, or other types of information. This relatedness is most commonly used for:
- Search: how similar is a search term to a body of text?
- Recommendations: how similar are two products?
- Classifications: how do we categorize a body of text?
- Clustering: how do we identify trends?
Vector column
https://supabase.com/docs/guides/ai/vector-columns
First, enable the "Vector" extension on our database, and then add a new column to our movie table using the SQL Editor.
ALTER TABLE movies ADD COLUMN embedding vector(384);
Generate embeddings locally
https://huggingface.co/docs/transformers.js/index
Let’s create a new NodeJS project (npm init) in a separate folder, and explore how we can generate embeddings locally.
- install Transformers.js
npm i @xenova/transformers
Use the Supabase/gte-small model to generate embeddings based on a piece of text.
import { pipeline, env } from "@xenova/transformers";// Configuration for Deno runtimeenv.useBrowserCache = false;const pipe = await pipeline("feature-extraction", "Supabase/gte-small");// Generate the embedding from the user inputexport const generateEmbedding = async (text) => {const output = await pipe(text, {pooling: "mean",normalize: true,});// Extract the embedding outputreturn Array.from(output.data);};
Generate and save movie embeddings
import { generateEmbedding } from "./generate_embeddings.js";import { supabase } from "./supabase.js";const getMovies = () => {return supabase.from("movies").select("*").is("embedding", null);};const addMovieEmbedding = async (movie) => {const embedding = await generateEmbedding(movie.overview);await supabase.from("movies").update({ embedding }).eq("id", movie.id);console.log("Generated embeddings for movie: ", movie.id);};const processAllMovies = async () => {const { data: movies } = await getMovies();if (!movies?.length) {return;}await Promise.all(movies.map((movie) => addMovieEmbedding(movie)));// call again for the next batch of itemsprocessAllMovies();};processAllMovies();
Get similar movies
Now that all our movies have the vector embedding, we can query our database for related movies. For that, we have to create a new Database function, that will use the <=> operation to compute the distance between 2 vectors of movies using the Cosine distance.
More information about querying vectors can be found here: https://supabase.com/docs/guides/ai/vector-columns#querying-a-vector--embedding
create or replace function match_movies (query_embedding vector(384),match_threshold float,match_count int)returns table (id bigint,title text,tagline text,overview text,similarity float)language sql stableas $$selectmovies.id,movies.title,movies.tagline,movies.overview,1 - (movies.embedding <=> query_embedding) as similarityfrom movieswhere 1 - (movies.embedding <=> query_embedding) > match_thresholdorder by similarity desclimit match_count;$$;
Now, we can invoke this function from our app, and receive similar movies based on a selected movie.
Semantic search
We saw how we can use Vectors and Embeddings to generate recommendations. We can use them also to provide a semantic search in our app. In other words, we can have a ChatGPT-like prompt, trained on our data to answer questions and recommend specific items from the database based on the user prompt.
For that, we should first generate the embedding of the user prompt, using the same model we generated embeddings of the API. Because we cannot generate the embedding inside the React Native, we will use a Supabase Edge function.
Let’s follow this guide to generate the Embed Edge function: https://supabase.com/docs/guides/ai/quickstarts/generate-text-embeddings
Source code
The source code of the final project can be found here on GitHub.
Conclusion
With the right tools, building AI-based apps is easier than it has ever been.
There are a lot of use cases where you can benefit by implementing the same system. It’s not just about movies.
You can build a knowledge database, save embeddings in the database using Supabase Vector, and then query it. This system can power search engines that can return specific pages/products/items/posts, recommendation algorithms, clustering and so much more.